|
MiG-21 MF Fishbed J |
Mikoyan-Gurevich
MiG-21 MF
Fishbed J
by Richard Chafer
|
MiG-21 MF Fishbed J |
| B a c k g r o u n d |
The MiG-21 first entered service in 1959 with the Soviet Air Force and is still in
front-line service with many other countries to this day. With modifications and
enhancements still underway (mainly and surprisingly by Israeli Aircraft Industries) the
MiG-21 will still be flying well into the next century. This longevity can only be matched
by the F-4 Phantom!
The MiG-21 has seen combat in many theatres including Africa, South East Asia, The Middle
East, West Asia and, most recently, Southern Europe.
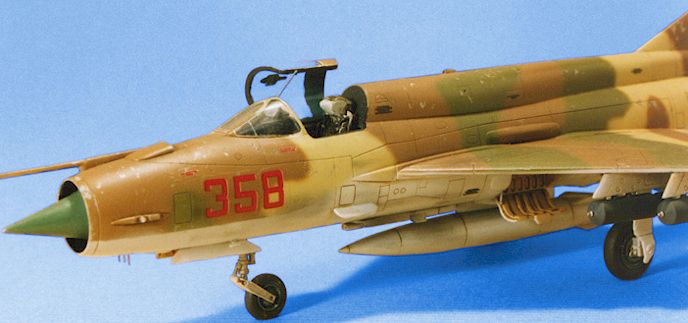
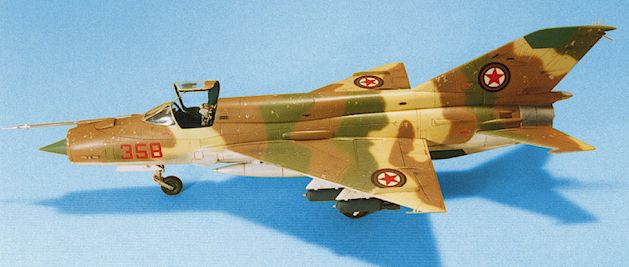
The aircraft modelled here is an Afghan Air Force machine .
| I n t h e B o x |
Fujimi’s "Jay Fighter", as the MiG 21 MF Fishbed "J" is sometimes
called, comes with all of its light grey and clear parts nicely packaged in separate
plastic bags. This thoughtful measure protects sprues from scratching each other -
especially important for the clear parts. The kit features fine engraved surface detail.
The break-up of parts is such that Fujimi can mould most of the significant versions of
the MiG -21 with minimal modification to the moulds.
Ejector pin marks are evident on some parts, especially the undercarriage doors and the
undercarriage legs. The instrument panel comes as a clear part. Careful masking of the
instrument dials and painting the front face of the instrument panel in the Russian
blue/green cockpit colour and then painting of the rear of the instrument panel black
results in a reasonable attempt at the real thing.
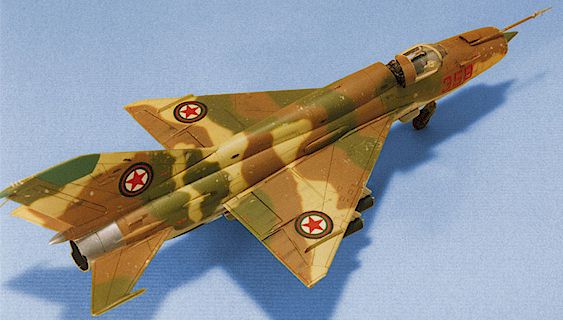
Decals are provided for five aircraft. Two Iraqi Persian Gulf War machines, a Syrian Air
Force machine 1982, Afghani Air Force and a Bangladeshi aircraft are the subject choices.
| C o n s t r u c t i o n |
The cockpit is reasonably well detailed for 1/72 scale. All I added was a True Details
KM-1 ejection seat. Instrument detail is appropriately raised. This eases the task
of picking out the fine points of the cockpit. The exhaust can area comprises of 4 parts,
being two part exhaust trunking an afterburner with raised detail and exhaust ring
detailed with engraved lines.
With cockpit, exhaust can, nose cone and front undercarriage bay enclosed between the
fuselage halves all that is left is to add the spine/hump, fin, wings and tailplanes. At
this stage you should be prepared to fill any gaps. I had to use filler in the usual spots
(i.e. wing to fuselage, tail).
The kit supplies separate flaps and ailerons. However you will have to cut the flap
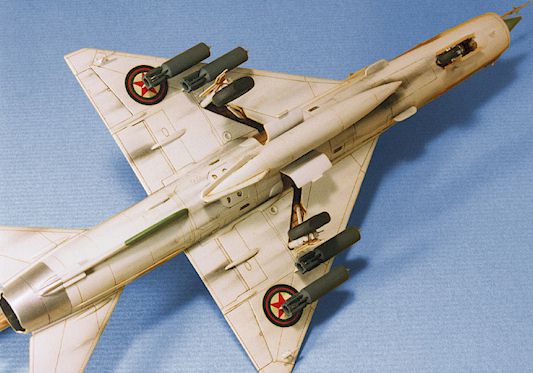
actuator covers (D28) to lower the flaps. Under-wing ordinance consists of two R-3S
infra-red missiles and a pair of drop tanks.
On my example I added four Prosab-250 cluster bombs from the Dragon Modern Soviet Aircraft
Weapons set number 3 and a center-line 490 liter drop tank.
Details added to the kit were as follows:
* Ejection seat firing
handles.
* Support strut for
canopy.
* Piping on
undercarriage legs.
* Odd rods (the 3
prongs under the nose & on top of the tail).
* Pitot tube.
* Gun barrels drilled
out.
* Tyres flattened and
bulged.
* Aerial on tail rear.
| P a i n t i n g |
This model was built several months before my F4U-1 Corsair. At
the time I was experimenting with the chipped paint effect. For this project I painted the
model with Testors Chrome enamel, left it to dry for a couple of days then start spaying
the camouflage colours over the top.
Paint used was Gunze Sangyo mixed from various shades to achieve the desired colour.The
paint was thinned to a ratio of about 15:1, thinner to paint using a combined mix of
Tamiya and Gunze thinners. This may seem like I overdid the thinning, but it was the only
way I could achieve the fine feathered edge that I was after.
The airbrushing took two and a half days, just for the upper colours! As I discovered
during this stage, it is better to walk away and come back to it if things aren’t
going too well and your starting to get angry with your model and airbrush. This way you
preserve your model and your sanity!
I was left with some thick paint layers because of the way I was gradually building-up the
paint. When it came to "chipping" through this layer of paint to reveal the
silver underneath I encountered two problems. One was that the paint was reluctant to come
off!!! The other was that when it did come off the depth between the two was quite
noticeable.
| D e c a l s a n d F i n i s h i n g |
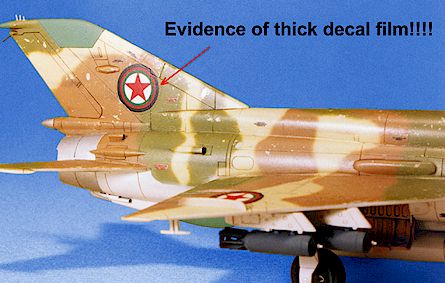 The decals supplied in the kit are well printed, however they are quite
thick. This problem is demonstrated in the image to the right.
The decals supplied in the kit are well printed, however they are quite
thick. This problem is demonstrated in the image to the right.
However, the decals did adhere well to the paint after an application of Gunze Sangyo
decal setting solution.
After the decals had set for a day Gunze matt varnish was sprayed on to seal them. This
was followed by an application of pastels to the relevant areas. Artists Burnt Umber
acrylic was thinned with water and run into the panel lines, which in turn were also
sealed.
The kit was easy to build with no great problems encountered during construction, and I
was very pleased with the end result. So pleased in fact that I’ve nearly finished a second
MiG-21, this time a Nigerian example.
| R e f e r e n c e s |
Publikace 4+ publication MiG-21
An excellent Czech publication.1991
ISBN 80-900708-09
Lock on No.21
MiG-21 MF Fishbed by Zoltan Buza
Verlinden productions.1993
(Great colour photos)
Fighting Colors
MiG-21 Fishbed in color by Hans-Heiri Stapfer
Squadron/signal publications. 1989
ISBN 0-89747-225-X
MiG-21 Fishbed in action
Aircraft Number 131. By Don Linn & Don Greer
Squadron/Signal publications.1993
ISBN 0-89747-290-X
Back to HyperScale Main Page
Back to Features Page
More Migs on HyperScale -
Chris Wauchop's 1/48 Lybian MiG 21 in the
Gallery