Home
| What's New |
Features |
Gallery |
Reviews |
Reference |
Forum |
Search
Home
| What's New |
Features |
Gallery |
Reviews |
Reference |
Forum |
Search
|
|
"The Universal Tank"
Building A British Sherman IBy Brett T. Green
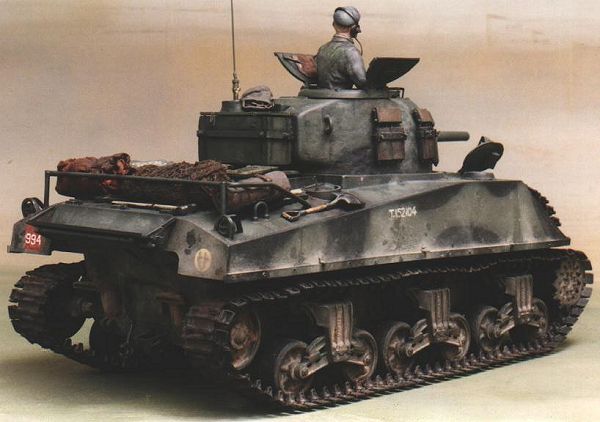
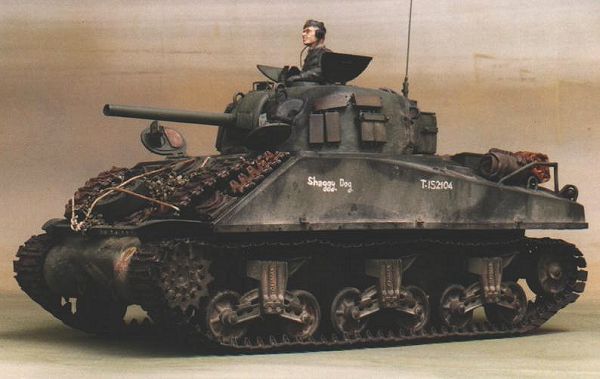
The M4 Sherman is both a much loved and much maligned vehicle. It has often been criticised for its high profile silhouette; its inability to penetrate the armour of German heavy tanks at anything greater than point blank range; its armour's vulnerability to high velocity guns; and its rather disturbing tendency to explode in flames when penetrated. On a vehicle-versus-vehicle basis, the Sherman was barely a match for a later model Panzer IV. It was totally outclassed by the Panther, Tiger and late war German Jagdpanzers and Sturmgeschutz. Its greatest strength was quantity. Allied standardisation of this reliable design meant that production facilities were not diverted from their main tasks by constantly re-tooling and debugging new designs. Combined with an almost unlimited supply line, total air superiority in Western Europe and a US industrial manufacturing base uninterrupted by the direct effects of war, the Sherman was deployed in such vast numbers as to be an effective weapon despite its shortcomings. In the period leading up to the Second World War, Great Britain had developed a craftsman-like tradition of building Armoured Fighting Vehicles. Rather than being mass-produced on automated factory lines, British tanks were painstakingly hand finished. This slowed production considerably. Also, British tanks were consistently one or two steps behind their German counterparts, and tended to have long teething periods while ironing out design and reliability problems. These problems eventually proved fatal to most home grown British designs. The only British tank to see service in Northern Europe in any quantity during 1944 was the Churchill -- and even this was mainly used in the infantry support role. The Cromwell, Challenger and the vastly superior Comet were used in fairly limited numbers. The bulk of the British armoured units in Europe were equipped with Shermans. These consisted mainly of Mk. I (M4); the Mk. II (M4 Cast Hull); the long-hulled Mk. V (M4A4) and a range of Firefly variants - mainly Mk. Ic and Vc (see my article on building an accurate Firefly Vc). Building a British ShermanI decided to build a Sherman Mk. I in service in France during late 1944. A photograph on page 46 of D-Day to Berlin provided my inspiration. It shows a Sherman I finished in Khaki Drab with a disruptive Black camouflage pattern. The vehicle has a number of interesting attributes, including unusual extra armour; lots of stowage; early narrow mantlet; cast transmission housing; foliage-assisted camouflage and three bar cleat tracks with short duckbills. I built this model during 1994 just before Dragon and Tamiya commenced their Shermanfest -- chalk up another one to Murphy's Law of Modelling! The simplest option for building a Sherman Mk. I at this time was to buy the Kirin resin conversion. This conversion included a new upper hull, turret with a choice of early narrow or later wide mantlet, hatches, scopes and direct vision covers. I used the Tamiya M4A3 kit as the donor kit for the lower hull, suspension and fittings. Of course, the best way to build a Sherman I today is to buy the new Tamiya M4 kit.
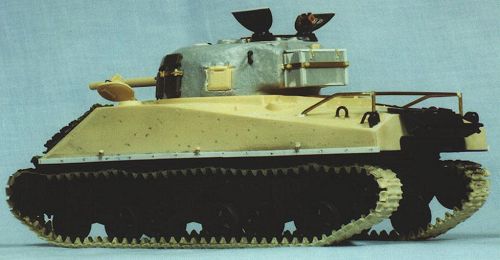
Unless you happen to have the old Tamiya kit and the Kirin conversion in your collection; plus the overwhelming urge to inhale some resin dust; you probably won't be terribly interested in how this conversion slaps together; however, some of the modifications and improvements may be of interest to modellers building a British Sherman based on the new Tamiya kit. Lower Hull and SuspensionThe new Tamiya kit offers the choice of the bolted or cast transmission cover. Both versions were seen on British Shermans, but my vehicle required the cast nose (fortunately this was the part included in the older M4A3 kit). Tamiya's new Sherman sources a number of parts from the older M4A3 kit including the suspension units. These stand up quite well by today's standards, with fine detail including casting numbers moulded on the units. The only real problem is that they are not articulated. If you want to model your Sherman tackling some challenging terrain, you will have to swap the suspension units from an Italeri or Dragon kit. It should also be noted that the trailing return roller mount is of the later, up-swept type. Check your references carefully to see if the vehicle you are modelling uses this type, or the horizontal mount often seen on early-to-mid production Shermans. Conveniently, my reference photo was unclear enough for me to assume the mounts were as per the kit. The only mainstream kit that contains the horizontal trailing return roller mount is the above-mentioned Dragon M4A1. The new Tamiya kit also offers the choice of the open-webbed pattern or solid drive sprocket; and either solid or spoked roadwheels. Check your references carefully. I built the lower hull and suspension as per kit instructions. I did not realise for some time that the rear hull and exhaust arrangement used on the M4A3 was totally inappropriate for the Mk. I Sherman. If you are using the new Tamiya M4 kit, you will not encounter this problem. Upper HullI made a number of improvements to the upper hull. I started by lightly pitting the surface of the resin using my motor tool and a small, round headed bit. I then added sandskirt mounting strips to the lower edge of the upper hull. I used .010" � .080" Evergreen brand styrene strip for this job. Before gluing the strips to the side, I drilled out mounting holes at regular intervals using a pin vice. My reference vehicle had three pieces of small, right-angled metal welded above the sandshield mounts. I bent these from .060" wide brass strip, and super-glued them in place. I assumed that they were also on the opposite side. The next task was to fabricate the stowage rack on the rear upper hull. This was bent from .050" brass rod. Mounting points were drilled in the upper hull to accommodate the forward mounting points of the rack. The rack was then super-glued in place and the rear, vertical mounts were finally glued in place. I used Squadron White Putty to represent weld beads on the stowage rack and the angle brackets. Turret
This particular vehicle carried spare tracks on mounts on the turret sides, but also used track pads apparently stuck to the turret. I am truly mystified how this was achieved. The track pads were rubber and therefore couldn't be welded; but there are no visible means of support. Another puzzle is that at least one of the track pads is actually bent to follow the contour of the turret - I can't imagine how that was d a general clutter of spare tracks and a roadwheel to the front of the vehicle. I attached the driver and co-driver's hatches, which were detailed with piano-wire handles. Finally, Tamiya tools and hull fittings were fixed to the rear deck. Painting and MarkingsI sprayed the entire vehicle Tamiya Acrylic Flat Black. I then masked off the areas which were destined to stay black in the camouflage scheme with "Post-It Notes" cut to shape. I sprayed several shades of Tamiya Green to achieve a patchy appearance so typical of vehicles in the field. After removing the masking tape, I hand painted the details and added stowage to the rear deck. Model ship rigging was used to represent rope on the forward hull. I also added a couple of small sprigs of "military fern" for foliage. Before final weathering, I hand painted the vehicle name and serial with Tamiya acrylic paint. Other markings were a combination of Verlinden dry transfers and hand painting. To complete the project, I applied a liberal dusting of light coloured pastel chalk, interrupted by streaks and puddles of thin black acrylic wash.
ConclusionAs mentioned earlier, I built this Sherman in 1994. Both the armour modelling market and my modelling skills have moved on substantially in the intervening three years. This conversion did not represent my finest modelling hour, but it was an enjoyable project. For me, it represented an important step in feeling confident about working with resin. I will probably use some of these techniques and improvements again when I eventually get around to building the new Tamiya M4. Or, on the other hand, I may just get lazy and use the new Accurate Armour British Sherman Update sets! British Sherman Mk. I - Updated Resource GuideIf I were to build this vehicle today, there would be a broader range of alternatives available for the base kit and improvements for me the choose from. The following list is not intended to be totally comprehensive, but a snapshot of helpful items:
References
|
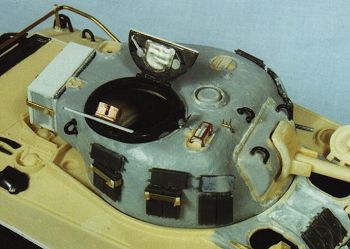 I decided to add some extra texture to the Kirin resin turret. I roughened
up the surface with the motor tool, then blended the effect with Gunze Mr. Surfacer. The
new Tamiya kit does not offer the option of the early narrow M34 mantlet, so you will have
to raid the spares box or a Dragon M4A1 if you want to build this variant.
I decided to add some extra texture to the Kirin resin turret. I roughened
up the surface with the motor tool, then blended the effect with Gunze Mr. Surfacer. The
new Tamiya kit does not offer the option of the early narrow M34 mantlet, so you will have
to raid the spares box or a Dragon M4A1 if you want to build this variant.  I scratchbuilt a stowage box from styrene strip and card. Brass strip was
used to represent the mounting strap, and four Verlinden bolts secured the box to the
strap. Latches were bent from brass wire. Finally, after super-gluing the box to the rear
of the turret, I made a hinge by winding fine electrical wire around a thin brass rod.
I scratchbuilt a stowage box from styrene strip and card. Brass strip was
used to represent the mounting strap, and four Verlinden bolts secured the box to the
strap. Latches were bent from brass wire. Finally, after super-gluing the box to the rear
of the turret, I made a hinge by winding fine electrical wire around a thin brass rod.