|
Tamiya's AH-1 Skyraider |
by
John Kerr
Images by Richard Chafer
|
Tamiya's AH-1 Skyraider |
HyperScale regular John Kerr concludes his epic description of building Tamiya's great new Skyraider kit.
Back to Part One
Back to Part Two
" A B L E D O G S I X " P A R T T H R E E |
Welcome back for the third and final instalment in a series of articles discussing the building of Tamiya's 1/48 scale A-1H Skyraider. This instalment is more like Parts Three and Four combined due to its length compared to the previous articles.
The story so far: Tamiya's Skyraider A-1H depicts a US Navy aircraft with three decal schemes plus plenty of ordnance options. It also contains several unused parts which should come into play when the kit is inevitably re-boxed as a USAF "Sandy".
The plan was to build the kit "straight-out-of-box". The only exceptions were supposed to be a replacement seat from KMC and perhaps some ordnance also from KMC (I abandoned the idea of adding some wire for the brake lines down the undercarriage legs after examining the legs which are well detailed).
"Part One" got the building process started with some minor construction. "Part Two" took care of the majority of construction. Now on with "Part Three" and some unexpected trouble!
P a i n t i n g |
Having completed construction of the airframe in Part Two it was finally time for some serious spray painting. My preferred airbrushing paints come from AeroMaster's Warbirds excellent range of colour enamels (by far the best airbrushing paints I've used).
Note: all un-named paints in this article are by AeroMaster, selected paints came from other ranges - these are identified by colour name and company.
 Prior to firing up my Tamiya Sprayworks, the whole airframe was
washed in lukewarm soapy water to remove all sanding dust residue and left for a few days
to completely dry.
Prior to firing up my Tamiya Sprayworks, the whole airframe was
washed in lukewarm soapy water to remove all sanding dust residue and left for a few days
to completely dry.
In handling, masking and painting the airframe be careful of the four small fairing added to the front of the fuselage (two fairings on each side). I accidentally knocked off two fairings so I advise firmly securing these parts with slow setting liquid glue.
First task was to mask off the cockpit tub and backrest. All lower and flying surfaces were sprayed White (several thin coats were needed to get a nice even finish). Next, you guessed it, all flying and lower surfaces were carefully masked off (this seemed to take ages and used up several feet of masking tape). The recessed side dive brake bays were also masked off.
All upper and side surfaces were then sprayed with several light coats of Light Gull Grey. Once dry, the defined area just behind the canopy was masked off and sprayed Ocean Grey - this area is covered by the canopy in the open position.
The most complicated part of the paint job was applying the anti-corrosion paint to the leading edges of the wings and rear stabilisers. Several more feet of masking tape was used to mask off the straight edges, and possible overspray areas, before they were sprayed Floquil's "Old Silver" (which slightly darkens under a matt finish). As for the leading edge of the tail fin, I masked this area off and rubbed on SnJ's "Aluminium Polishing Powder" (instead of spraying on "Old Silver" as I feared "bleeding" under the curved pieces of masking tape).
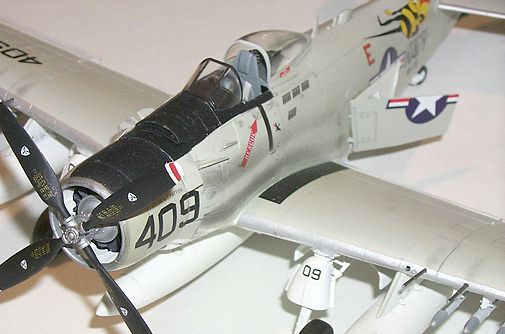
Next, the anti-glare panel and cockpit sills were masked off with masking tape and Blu-Tak and sprayed Matt Black. The three irregular shaped panels on the leading edge of the wings were masked off and handpainted with Humbrol's Matt Black. I do not know the purpose of these panels.
With most of the painting completed, several coats of Gloss Clear (AMD) was sprayed on in readiness for the decals. Now here is the only drawback of using AeroMaster's very flat enamels. They require several coats of gloss to achieve a nice smooth surface for decals (also I suggest using a 60/40 gloss to thinner mixture).
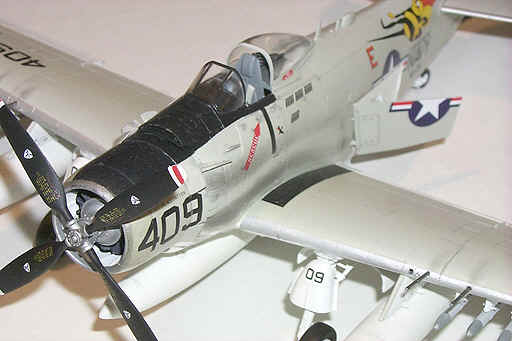
E n g i n e a n d C o w l i n g |
Tamiya's nose section is made up of the multi-pieced engine, a one-piece cowl (there is no seam to worry about), inner and outer cowl flaps, exhaust pipes and a one-piece propeller. There is the option of depicting both cowl flaps either open or closed with different parts provided for each option.
 The majority of the engine is rendered as a one-piece part. The
engine proper is moulded onto the firewall. It was painted Engine Grey (Model Master) and
"Old Silver" followed by a wash and dry-brushing. I chose to show the cowl flaps
closed so part D5 was painted White. Part D10 (whatever you call it - drive shaft cover ?)
was painted "Old Silver" and glued onto the propeller drive shaft, a poly cap
for the propeller was trapped between the two parts.
The majority of the engine is rendered as a one-piece part. The
engine proper is moulded onto the firewall. It was painted Engine Grey (Model Master) and
"Old Silver" followed by a wash and dry-brushing. I chose to show the cowl flaps
closed so part D5 was painted White. Part D10 (whatever you call it - drive shaft cover ?)
was painted "Old Silver" and glued onto the propeller drive shaft, a poly cap
for the propeller was trapped between the two parts.
The interior and bottom of the one-piece engine cowl was sprayed White. The cowl's interior and lower quarter was masked off, and the remaining exposed area was sprayed Light Gull Grey.
Next was the black anti-glare panel. The cowl was placed onto the fuselage and the masking tape placed exactly in line with the painted anti-glare panel on the fuselage. Black was sprayed onto the exposed cowl - and on to the bottom of the cowl ! @!#* So it was out with the fine grade wet'n'dry sandpaper, clean up, re-masking of the lower cowl followed by a shot of white (lost time about 1.5 hours).
Now that all the colours on the cowl were where they should be, the front edge of the cowl (both inner and outer) was carefully masked off and sprayed "Old Silver" (this was polished with some SnJ's "Aluminium Polishing Powder" before removing the masking tape).
The separate cowl and engine parts were now glued together (there is a notch at the top inside of the cowl that slots through a groove in the interior parts to ensure correct alignment).
It's at this stage that I made that fatal mistake, which I'm sure many of you will relate to, of thinking "things are going pretty well !". Once the cowl pieces were firmly set, the plan was to simply glue the cowl sub-assembly onto the fuselage, well that was the plan ! Here I struck a rather "significant" problem.
The one piece exhaust part, sprayed Japanese Primer Brown, did not fit onto the front of the fuselage - not even close ! To remedy the non-fit, the interior of the exhaust and the front of the fuselage were sanded until the exhaust part finally slipped over it's locating plug - no glue required here as the fit was still very tight.
The "domino effect" kicked in here! Next problem was getting the cowl sub assembly to fit over the exhaust part and butt up to the front of the fuselage. Again sanding of the mating surfaces was required, even now I can still see a slight gap between the fuselage and cowl. Considering the excellent fit of the rest of the kit, like most recent Tamiya kits, I was shocked by the poor fit in this area ! More on this later.
P r o p e l l e r |
Having resisted the temptation to completely "spit the dummy" over the cowling experience, I moved on. The one-piece propeller took quite some time and effort to paint. The unit was first sprayed Matt Black, the blades were then carefully masked off to allow the centre hub to be sprayed "Old Silver".
Next came the tips. The masking tape was removed from the blades. Clean cut masking tape was carefully applied to the blades to expose the blade tips. Both sides of the tips were sprayed White. The front of the tips were then masked off to allow the backs to be sprayed Yellow (refer instructions in AeroMaster's Skyraider sets). The top and bottom of the white tips (front only) were carefully masked off and the exposed middle handpainted Red (Xtracolour).
All sounds very complicated ? Yes but with careful masking the effect looks great! The whole unit was glossed up with a spray of AeroMaster's Gloss Clear. The stencil data and split propeller logo decals were then applied. A shot of Matt sealed all the decals.
OK so it was long winded but the propeller looks good with painted tips and logos.
D e c a l s |
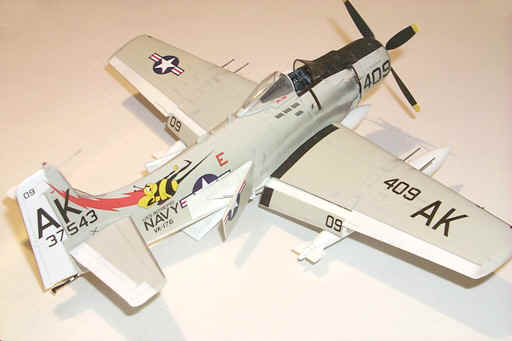
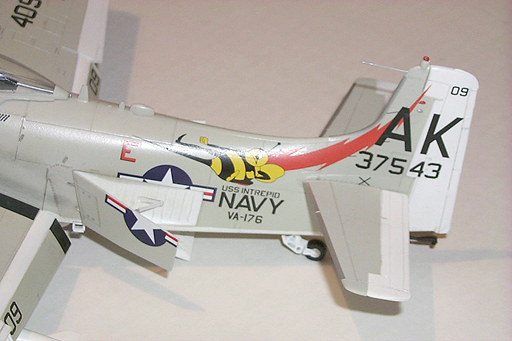
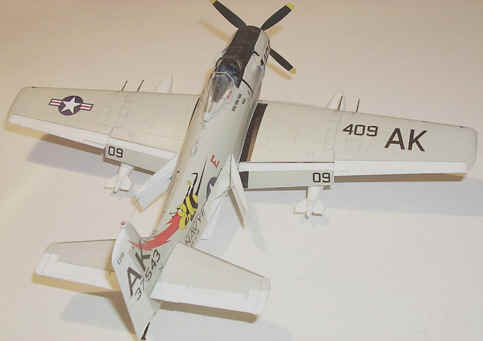
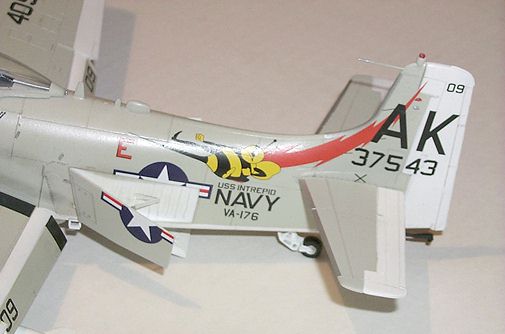
Decals, and applying them to a model, is probably my favourite aspect of modelling. As an avid fan of after-market decals, as a general modelling rule I always try to choose a scheme not included on the kit decal sheet. However I bent this rule for the Skyraider because the box-art subject of AK-409 from VA-176 "Thunderbolts" circa October 1966 is absolutely stunning.
 For those contemplating using Tamiya's A1-H decals you have the
choice of three schemes. The decals are in perfect register but appear too thick (well too
thick for my liking and use). Tamiya has gone back to producing their own in-house decals
after out-sourcing decal production to Scale-Master.
For those contemplating using Tamiya's A1-H decals you have the
choice of three schemes. The decals are in perfect register but appear too thick (well too
thick for my liking and use). Tamiya has gone back to producing their own in-house decals
after out-sourcing decal production to Scale-Master.
Except for the kit's stars 'n bars (primarily used because of the split decals Tamiya provide for the open fuselage dive brakes), I replaced all kit markings with identical items from Third Group's TGD48-017. The similarly marked AK-405 of VA-176 can be found on one of AeroMaster's Skyraider sets.
All decals were carefully applied. Some needed a touch of AeroSol setting solution to snuggle them down into the recessed panel lines. The striking "Stinging Bee" tail-art decals are very long and curved - these proved quite tricky to apply. However it was worth the effort as the "Stinging Bee" tail-art would have to rate as one of the most colourful examples of art-work ever applied to a U.S. Navy aircraft.
W e a t h e r i n g |
Several different weathering techniques were used to give the Skyraider that "used" look.
First, all recessed panel lines and depressions received a Dark Grey wash (Tamiya thinner with a splash of Tamiya Black and Ocean Grey). This wash was applied with a very fine paintbrush (I know applying washes this way is rather tedious but I feel it's worth the effort). I like the deep recessed panel lines of Tamiya kits (well deeper than the panel lines on most Hasegawa kits) as they really lend themselves to washes.
 The next stage of weathering was to simulate a bit of paint chipping
off the corners of various panel edges. Humbrol "Polished Aluminium" was
carefully spot painted on (including some panels covered by decals). The black anti-glare
panel and wingwalks were toned down with a very light drybrushing of Gunship Grey (Model
Master) followed by a heavier drybrushing of "Polished Aluminium" on the panel
edges.
The next stage of weathering was to simulate a bit of paint chipping
off the corners of various panel edges. Humbrol "Polished Aluminium" was
carefully spot painted on (including some panels covered by decals). The black anti-glare
panel and wingwalks were toned down with a very light drybrushing of Gunship Grey (Model
Master) followed by a heavier drybrushing of "Polished Aluminium" on the panel
edges.
The whole model was matt coated (AMD) to completely "kill" the gloss sheen of the decals and clear coat. Now came the part I was dreading - simulating the heavy exhaust stains on the front of the fuselage. These stains are very prominent on Skyraiders, especially on a light gull grey painted background. Over the past 2 years I've been experimenting with a set of weathering powders by, none other than, Prof. Weathers. "Exhaust" powder was rubbed on with the tip of a cotton ear-bud - easy ! This powder was also lightly streaked behind the wing cannons.
F i n i s h i n g T o u c h e s |
Almost done - the finish line is in sight! With the base airframe finished it was time to attach the add-on parts.
First were the underwing parts, the airframe was flipped upside down and gently placed on suitable sized containers to ensure it remained straight and did not move.
The undercarriages are simple but effective - no problems here. The main undercarriage legs and wheels consist of only four pieces, two each for the legs and wheels. All parts have a press fit (including the "knuckle" doors).. The rear undercarriage also consists of two parts. The three undercarriages were pressed in place. The only glue I used in the main undercarriages was attaching the wheel hubs to the tyres !
The small underwing pylons (all twelve of them) were attached with liquid glue. Once dry, the small underwing pylons received their stores. In the end I went with the kit HVARs. The three external fuel tanks and pylons were pushed in place. No glue was required to attach the tanks to the pylons (remember they are interchangeable).
While I had the model upside down, I added the lower fuselage dive brake (in the open position), flaps in a drooped position, steps to the lower fuselage sides (one each side) and the tailhook. Did I mention I broke the tailhook clean in half? No? Well "Murphy's Law" strikes again! The story goes like this; I had it stuck in blu-tak, sprayed it White, later I went to grab another part close by and somehow hit the tailhook with my hand - SNAP ! Glue, sandpaper, more verbal self-abuse, another shot of White paint.....
 After uprighting the kit with no parts falling off, it was time for
the side fuselage dive brake doors. Their actuating arms were glued inside the doors. Once
dry, the doors were gently glued into their hinges (making damn sure the pin of each
actuating arm was glued into it's small locating point in the dive brake door). While we
may never see a photo of open dive brakes on a Skyraider I could not resist using this
unique option.
After uprighting the kit with no parts falling off, it was time for
the side fuselage dive brake doors. Their actuating arms were glued inside the doors. Once
dry, the doors were gently glued into their hinges (making damn sure the pin of each
actuating arm was glued into it's small locating point in the dive brake door). While we
may never see a photo of open dive brakes on a Skyraider I could not resist using this
unique option.
The rear fuselage stabilisers each have a plug-in fit so these were painted and weathered separate to the airframe. I had to sand the stabiliser plugs and widen the fuselage openings with a hobby knife blade before they would go all the way in. I used super glue to ensure no sagging of the stabilisers.
Next were the two pitot tubes; one at the top leading edge of the fin with another under the outer starboard wing.
I had planned to use a resin seat from KMC but cracked the floor while razor sawing the thick resin pour plug off the bottom of the seat (not KMC's fault as I did not realise the seat pan was so thin, next time I will sand the resin pour plug off like I normally do !). So I used the kit seat with seat belts simulated simply with masking tape.
Almost done ! The canopy rail was placed behind the cockpit, there are three locating holes to keep this flimsy piece in place.
And finally, the clear parts of canopy gunsight, windshield and canopy (all painted, decaled and weathered at the appropriate stages) were attached with thinned craft glue. The fit of the windshield to the fuselage was excellent.
My Tamiya 48th scale A1-H Skyraider was now finished !
S u m m a r y |
First of all, many thanks to Richard Chafer for the photographs of the completed model.
The Skyraider was purposely built for display at the 1998 "S.A. Scale Model Expo", Adelaide, South Australia. This annual scale model competition and display is hosted by the South Australian Plastic Modeller's Association, I am the event co-ordinator so please excuse the free "plug". And believe it or not, it was finished with a day to spare! If I had not self-imposed a set deadline then I would have given myself more time and taken more care along the way - but hey, it's another model finished from my cupboard !!
If you were paying attention while reading Parts One and Two you'll have some knowledge that the kit is a gem to build. However there a couple of areas to watch out for:
I recommend anyone building the kit to carefully check the fit of the one-piece exhaust part to its fuselage plug (after joining the fuselage together). If the fit is poor then take action before painting the airframe. However I suspect the troublesome fit of the nose area on my model was due to warping in one or both fuselage halves.
I believe in "truth in modelling" - actually highlighting problems or potential problems in kits as well as owning up to my own mistakes. So I'm willing to confess to a couple of classic modelling "goofs" I made with the Skyraider. These include spraying the bottom of the engine cowl black, snapping the tailhook in half, cracking the nicely detailed KMC resin seat - nothing terminal but you have to laugh at yourself sometimes (after all isn't modelling suppose to be a creative, stress releasing hobby ?).
Now about the paint and decals. As previously stated, I feel AeroMaster's enamels are the best colour paints I've used for airbrushing (very thin out of the bottle and require only a small amount of thinner, fast drying, very tough finish). The Third Group decals were superb being custom printed by MicroScale.
Many modellers, me included, have waited an eternity for a new Skyraider in 1/48 scale. "We" are definitely not disappointed as Tamiya has produced a superb kit of this popular subject. I now plan to build another Skyraider which will be finished in the striking Vietnam camo scheme carrying U.S.A.F. markings.
And now for the $64,000 question - could Tamiya possibly do a multi-seat Skyraider A1-E ?. "We" can only hope and pray !
TOTAL KIT RUNNING TIME 45 hours
JOHN KERR
of the SOUTH AUSTRALIAN PLASTIC MODELLERS ASSOCIATION, Adelaide, South Australia
Back to HyperScale Main Page
Back to Features Page