Correct identification of T-34/85 variants is a particularly tricky and inexact business. Part One of this short series, " The T-34/85 in the Great Patriotic War", attempts to outline the specific features of the upgunned Soviet medium tank. Part One, "Identifying Wartime Variants of the T-34/85", will be ready for publication on Track-link in February.
In the meantime Part Two, "Building the DML T-34/85", was completed first! This article analyses the contents of the new DML kits, and provides a step-by-step discussion of the assembly of the model.
1997 must have been the "Year of the T-34". RPM/Maquette released their detailed T-34/85 Model 1946; plus their separate engine, turret and track link sets. This was closely followed by Zvezda and Italeri with their simpler, but dimensionally accurate T-34/76 Model 1943, T-34/85 Model 1945 and SU-100; then RPM again with their limited edition T-34/76. Even while Soviet armour fans were counting their blessings, DML surprised us with their announcement of two T-34/85 kits. DML have constantly improved their approach to accuracy, detail and fit since their entry to the market in the late eighties. These T-34 kits are among DML's best offerings in all these aspects.
DML have labelled this kit "T-34/85 Mod. 1944". It is not. Although it is pointless to make definite statements about Soviet armour, this kit displays all of the features of a typical T-34/85 Model 1945. Having said that, there really is not a great deal of difference between a late production Model 1944, and a Model 1945. Replace the kit cupola with a smaller item and a split hatch, and you have an accurate late Model 1944. Sand off the turret side bulge for the power traverse, and you have an accurate early Model 1944. Part One examines the question of identity in more detail. For the time being, however, I am happy to build the Model 1945!
DML's 1/35 scale kit comprises 20 sprues of light grey styrene, one clear lens cover and a piece of string. Markings are provided for five vehicles. Parts are generally crisp. Cast texture on the turret and hull machine gun bulge is well represented. Weld beads are present in the appropriate places. Features include a positionable transmission hatch (with inner-ring detail moulded onto the rear hull plate); and separate parts for the engine inspection hatch and radiator fan cover. Unfortunately, the mesh of the radiator fan cover is moulded as a solid part. The hull under the fan cover is well detailed with bolts and panel lines, although the two prominent positionable cooling louvres are not included - just a large rectangular hole.
The kit is full of commendable detail. The driver's hatch looks very convincing, as does the mantlet and the tiny separate tie-downs for the turret. DML have resisted the temptation of taking the easy way out with tools and hull fittings. Although many of these parts would be in common with items already moulded for the JS-2 and JSU family of kits, DML have produced new, improved parts. The siren is now a two part moulding with a hollow horn, the one piece saw and cradle is very crisp, and the headlight is a three piece assembly including a separate electrical cable and clear lens (a trend I hope will be followed by other new releases!).
DML have done a particularly good job with the wheels. They are the rubber-tyred, "full-spider" variety with a row of twelve lightening holes near the outside edge of the wheels and a row of eleven smaller holes close to the hub. The twelfth small hole is correctly moulded shut. The tyres include engraved detail representing rubber seam marks (although they were raised on the real vehicle, and likely to have worn off almost immediately) and even tiny lettering! This variety of wheel is appropriate for the Model 1945, either as a full set or sometimes in combination with Half-Spider or the smooth-tyred late pattern plain dished roadwheel. However, it was also very common to see Model 1945s with full sets of these alternate wheels.
On the downside, there are a number of nasty sinkmarks, notably on both sides of the hull rear, on top of the engine vents and at the end of the gun barrel. Even bigger sinkmarks are present on the suspension arms and on the inside face of the Christie spring units, but these are invisible once the vehicle is assembled.
The front fenders and hull splashguards are moulded onto the upper hull. This is somewhat surprising, as it would seem to limit DML's use of the upper hull for earlier variants. The hinge and join detail on the front fenders is oversimplified. Tie downs are moulded to the kit hull, but look very good. However, the tie downs on the trackguards are oversimplified and located in the wrong position. They should be removed from the upturned lip of the trackguard and replaced with bent wire around two millimetres in from the edge.
The smoke canisters commonly seen on Model 1945 T-34s are missing, but parts G10 are a very nice representation of their mounting brackets. These parts are not mentioned in either the parts breakdown or the instructions. The cabling conduits for the smoke detonators are also moulded onto the rear hull, meaning that the determined modeller only has to source the two small drums to complete the assembly. The three external fuel drums have accurate mounting brackets, but feature damage which I find a little uniform and unrealistic. The grilles at the top and side of the engine deck are moulded as solid inserts, although the effect is very convincing. Strangely, DML provide no bolt detail on the round transmission hatch. The real thing featured seven prominent bolts to seal the hatch.
The turret is correct in size, shape and features for a Model 1945. DML have cleverly designed the gun and mantlet assembly. The bottom of the mantlet sits over a sleeve that forces the gun assembly to rest at a position about 15 degrees above parallel. No more "gunners droop"!
The lower hull and running gear are superb. All the key features are there - including the bolt detail on the final drive housing, the Christie box suspension units as separate parts, and the track-pin knock-in plates. DML even supply separate access covers for the lower hull. Idler wheel swing arms are separately moulded and may be pivoted in different positions. This is particularly important to achieve the correct tension for the big, two piece kit track-links. The track links are DML's best yet. The pattern represented is the common Type 1942 waffle. This is entirely suitable for a wartime T-34/85 Model 1945; although the 1944 type track would also be correct. The waffle moulding is extremely crisp, and there are absolutely no ejector holes or pin marks to clean up on any surface. There is a faint ghost of the waffle pattern on the rear of the links, but this will disappear under a coat of paint.
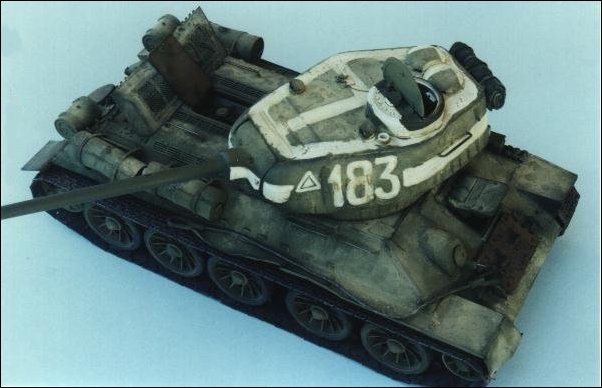
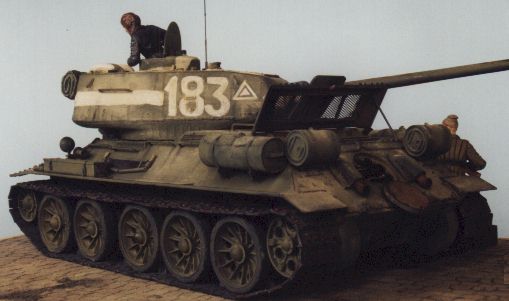
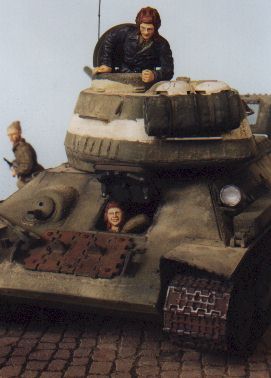
At first I decided I would build this excellent kit out of the box. Then I decided I should replace the solid moulded mesh on the radiator fan cover. So of course I would have to add cooling louvres. And it would be a shame to leave the positionable engine and transmission hatches closed. Which, in turn, meant that I would have to add some basic engine detail. You all know how it goes! I based my model on a photograph of a T-34/85 in a temporary tank park at the edge of the River Spree in Berlin on 29 April 1945. This is a battle-weary vehicle bearing an interesting combination of campaign and tactical markings.
Lower Hull, Suspension and Track Assembly
 |
| The damaged trackguard and the new smoke cannisters are clearly shown here. Note the roughly applied putty on the lower rear hull side to represent damage caused by the welded trackguard being torn from the hull. |
I assembled the lower hull and running gear according to Steps 1 through 5 of the kit instructions with a couple of exceptions. Part A5, the final drive cover, is bulged slightly on the surface that mates with the drive wheel. Upon dry fitting, I was concerned that this would affect the alignment of the drive sprocket with the roadwheels. I shaved the bulge off both parts A5 and the drive sprockets lined up perfectly. At this stage I glued the idler wheels to the pivoting mounts (parts A6), but I did not glue them to the hull. Before fitting the roadwheels I sanded the centreline seams and beat up the tyres with a small, square headed burr on my Dremel. I also cut a couple of small chunks from the edge of each tyre with a hobby knife.
I decided to use a set of pre-production workable resin T-34 tracks from an Australian accessory manufacturer called Anvil Miniatures. They tracks are supplied as separate links with no casting blocks and only the slightest breath of feather-like resin flash. The resin casting is very crisp. On the full sized track, there is a large hole in the waffle pattern over the top of the guide horn. Anvil has represented this feature well.
The best news is that the tracks simply click together. No glue, no jigs, just press one track into the next. I assembled two full lengths of 68 links per side and looped them around the roadwheels and drive sprocket. Remember, the idler arm and wheels are not attached to the hull yet. I dry fitted the idler assembly on one side, and rotated the arm until I was happy with the tension of the track. If there had been a problem at this stage with the track being either too tight or too loose, I could click-on or click-off a couple of links. When I was satisfied, I superglued the idler arm in place. I repeated this process for the other side.
There is absolutely nothing wrong with the kit tracks, but the assembly method will be a little different. My recommendation would be to assemble a straight run for the top, a straight run for the bottom and a curved run for the drive sprocket and glue these in place. Next assemble a run for the idler wheel, and test fit with the idler arm as above. Glue the idler arm and the front track run when you are satisfied.
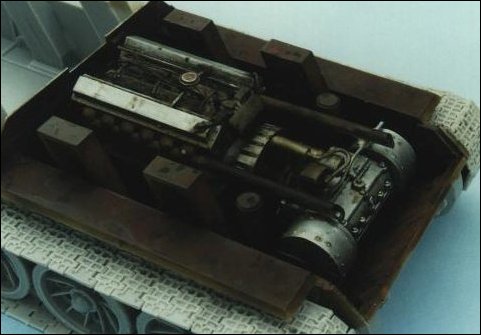
The RPM/Maquette Engine
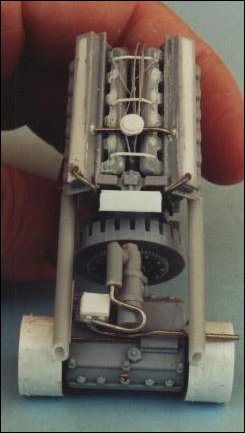 |
| Maquette's Engine Set with the modifications described in the text. Note the extent of putty required on the cylinder heads! |
Although not much of the drivetrain is visible through the open inspection and access hatches, I had to provide some additional detail. I originally purchased the Maquette engine set to use in the RPM/Maquette T-34/85 Model 1946. After some test fitting, it seemed that this inexpensive accessory would fit equally well in the DML kit. Maquette provides the basic transmission, transmission brake drums, fan and V-2 diesel engine installation for the T-34. It requires a little dressing up, but fortunately this is not difficult.
The set consists of 27 parts moulded in soft, medium grey styrene. The parts are not moulded to the same high standard as DML's kit, so some preparation was necessary, including slicing some large ejector pins off parts 11, 12 and 13, and filling some large sink-lines along the cylinder heads (parts 5). I assembled the basic components as per Maquette's instructions. The completed unit looks quite accurate - certainly better than Verlinden's T-34/85 engine set - although some details such as the fan are oversimplified. I added details that would be visible through the open hatches. These included exhaust pipes, electrical boxes, a carburettor, air cleaners and engine wiring. All these were fabricated from scrap plastic sheet, fusewire and styrene tubing. The cap for the carby was formed from two punched styrene discs.
I built a firewall from sheet styrene and added panels and boxes for interest. I test fitted the upper hull and lower turret to make sure the firewall did not foul these parts. I had to remove Maquette's part 14 (at the front of the engine) to fit the firewall and still allow the turret to traverse. When I was happy with the fit, I glued the firewall in place and painted the engine bay a rusty red-primer colour. I sprayed the entire engine and transmission before fitting it to the engine bay with Tamiya Spray AS-12, Bare Metal Silver. When dry, I dirtied up the engine and bay to represent oily diesel machinery using both acrylic paints and Rustall.
The full size T-34 contains a lot of extra detail including radiators and fuel cells, but as these would be impossible to see through the restricted view of the hatches I did not add them to this model.
 |
| The drivetrain painted and fitted to the lower hull. The workable Anvil tracks have already been installed. |
Upper Hull
I cut the solid moulded mesh from the radiator fan cover (part B15) by repeatedly scribing along the inside panel line of the grille, cross cutting with a sharp knife and snapping off the small triangles of plastic. I cleaned up the hole with a hobby knife. I then used the Eduard brass frame from their T-34 detail set. This frame was designed for the Tamiya kit and is too long, so I cut it to size and superglued it over the open hole. I didn't like the flat mesh provided by Eduard, so I used CMD's excellent fine woven mesh to achieve a more realistic effect. I trimmed a paper template to size and checked that it would fit under the brass grill. When trimmed to the correct size, I used the template to cut the appropriately sized mesh, and superglued this underneath the brass. As I would be displaying this cover open, I cut off the long locating pins. I used 0.1mm x 1.00mm brass strip to detail the underside of the screen.
The hull below the fan cover is well detailed but does not include the two prominent louvres that regulate the cooling of the engine and transmission compartments. I used plastic strip to represent the louvres and mounted them on thin brass rod running lengthwise along the centreline. Each end of the brass rods were glued to the underside of the hole. Both louvres were positioned at a 45-degree angle to display some fan and engine detail. I cut small panels from sheet styrene to blank over the locating holes for the fan cover. Modeller's not wishing to include engine detail could legitimately model the louvres shut. When closed, the louvres sit flush with the surrounding panels.
The cover was hinged at the forward edge. Long locking pins at the back of the panel held the cover shut. I carved off every second position on the two long locking hinges at the back of part B15. I then cut four 1mm lengths of fine styrene rod to represent their opposite numbers on the upper hull. These were carefully glued in position.
The boltholes on the ring inside the open transmission inspection hatch are not drilled through. I used a pin vice to correct this. I then placed the transmission inspection hatch (part B10) in place and used the holes I had just drilled as a template to drill seven holes in the hatch. As the hatch was to be displayed open, the bolts would not be in place.
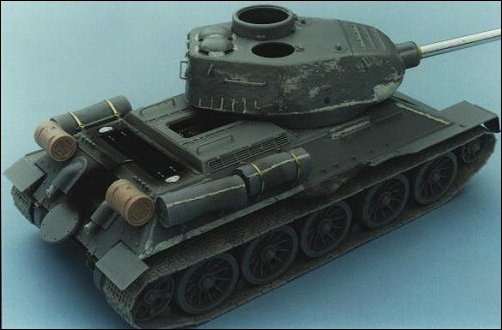
The vehicle I was modelling had severe fender damage. I cut off both front fenders and thinned the under surface of the forward trackguards with a grinding attachment in my Dremel. I also cut off the back half of the starboard side trackguard. I formed a new starboard front fender from lead foil, using the recently removed plastic item as a template. Lead foil is a very responsive medium for representing damaged metal parts. The lead foil part was glued in place and detailed with brass strip. The new part was then "damaged" by bending it with flat-nosed electrical pliers. A short length of lead foil was glued to the hull to represent heavily damaged trackguard.
A general feature of wartime T-34/85s was big, sloppy weld beads. I used Tamiya masking tape and Squadron White Putty to emphasise the kit weld beads on the forward hull join and below the hull fillets. The fillets had a rough cast texture that was replicated with the aid of the Dremel.
The smoke canister racks (parts G10) were glued to the rear hull and a couple of resin drums were rescued from the spares box. Don't get too worried about their placement - the height seems to vary from vehicle to vehicle. Fine brass wire was glued between the moulded conduit and the smoke racks, and into the engine compartment. The external fuel tank mounts are very convincing but I was not so happy with the fuel drums. I first assembled the drums and carved off the strap, filler and handle detail. I filled and sanded the drums, then applied the heat of a cigarette lighter to warp them slightly out of shape. Careful not to set them alight! Weld beads were added with Squadron White Putty. When satisfied, I added new handles and straps from 0.1mm x 1.0mm brass strip. Triangular mounting points were bent from brass wire, and new filler caps were punched from styrene.
Turret
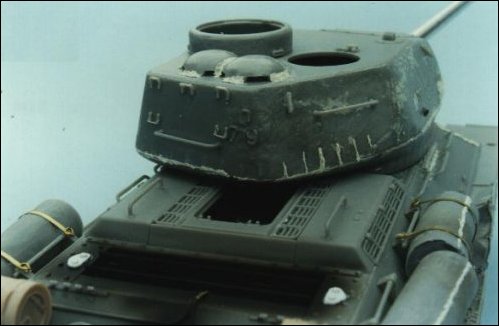 |
| The casting numbers on the rear of the turret were carefully sliced from DML's kit sprues! Also note the reconstituted casting marks from putty, the tiny separate tie-down parts, the and the rebuilt fuel drums and straps from brass strip. |
I re-textured the turret with liquid glue and putty. I also beefed up the rectangular fillet at the lower front cast line of the turret using putty. This pretty much obliterated the prominent vertical casting seams on the turret. These were reconstructed using putty and Tamiya tape. I added big, sloppy weld beads to the ventilator domes using the same method.
Casting numbers were added to the rear of the turret by carving part numbers from DML's sprues with a very sharp knife and gluing them to the turret with liquid cement.
I replaced the kit pistol port plugs with more conical items carved from thick styrene rod. A bedroll (from the spares box) was added to the rear of the turret and secured via the kit tie-downs with model ship rigging string. I also replaced the kit gun barrel with Jordi-Rubio's item number TG-36. I am not entirely sure if it is accurate in length, but it certainly is pretty!
The rest of the kit was finished according to instructions, except that I replaced the string with picture wire for the tow cable. I had some problems with the fit of the upper and lower hull, but I may have warped the upper hull when heating the trackguards prior to applying damage. Regardless, the fit problem was easily overcome by placing a strip of plasticard over the resulting step at the front hull join, and fairing it in with a wipe of putty.
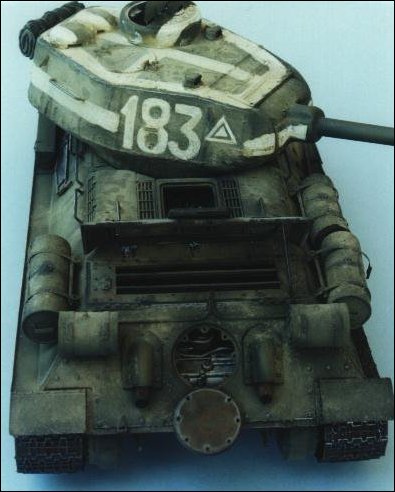 Overall dark green is not my favourite colour scheme. This vehicle, however, displayed interesting markings. Also, its battle-weary condition provided a good excuse for some heavy weathering. I was concerned that the combined effect of the rough cast texture of the turret and subsequent application of pastel chalks might highlight the edges of decals. I therefore decided to paint the numbers and tactical markings. To be safe, however, I decided to use a guide for my hand-painted markings. This is a slight modification to the technique used on the DML JS-2 I built some years ago. In preparation, I painted the entire turret white. I then scanned the instruction sheet of the RPM T-34 kit decals (which had markings for the vehicle I was modelling), and printed out a 1/35-scale copy of the numbers and triangles on a thick piece of paper. I applied Post-It respositionable glue (available as a handy glue stick) to the back of the printout, and stuck it to a cutting mat. I used a new knife blade to cut out the numbers and triangle markings, and positioned these on the turret. I used Tamiya masking tape to mask the stripe along the turret side and the cross on the roof; then sprayed the turret green. I removed the tape and the other markings to reveal the starkly contrasting white markings. The next step was to create the impression of hand painting by tracing around the numbers and stripes in the camouflage green with a fine paintbrush; then hand painting in white over the sprayed white markings. Finally, the markings were toned down with a light oil wash of raw umber. This was quicker and simpler than it sounds, and in the end produced an effect I was quite pleased with.
The tracks were removed from the vehicle and painted with a murky brown-black mixture. A coat of Rustall was then applied. When dry, I ran the 2B pencil along the high-points of the waffle track. ConclusionThe T-34 was a simple, yet effective and elegant design. DML have paralleled these attributes with their highly accurate T-34/85 Model 1945. The fit is almost perfect, the engineering is clever, and it is suitable for virtually all modellers from beginners to expert. The only shortcomings are the lack of a mesh grille for the radiator fan cover, the absence of smoke drums and the mysteriously missing bolt detail from the transmission hatch cover. The couple of visible sinkmarks are also out of character with the rest of the kit. But let's put these nitpicks into perspective - in a year when it has been raining accurate T-34s, this is the pot of gold at the end of the rainbow. These T-34/85 kits are among their best, if not the best, products in DML's short but spectacular history. I can't wait to see what they will spring on us next! ReferencesApart from the first reference, all the following books are in current publication:
Article and photographs by Brett
Green, January 1998.
|
 The rest of the vehicle was painted in accordance with
my usual technique. I undercoated the hull in flat black paint, then applied a topcoat of
green. This technique is not as effective with dark colours, so I used a generous
application of pastel chalk to represent the effects of the dusty Berlin street-fighting
on the vehicle. I blended and detailed this chalky finish with a combination of water and
thinned black acrylic paint before using a 2B pencil to highlight edges, scratches, the
saw blade and wear marks on the grab handles.
The rest of the vehicle was painted in accordance with
my usual technique. I undercoated the hull in flat black paint, then applied a topcoat of
green. This technique is not as effective with dark colours, so I used a generous
application of pastel chalk to represent the effects of the dusty Berlin street-fighting
on the vehicle. I blended and detailed this chalky finish with a combination of water and
thinned black acrylic paint before using a 2B pencil to highlight edges, scratches, the
saw blade and wear marks on the grab handles.