|

|
|
NSAWC F-14A Tomcat |

Hasegawa's 1/48 scale F-14A Tomcat and
Black
Box's F-14D replacement cockpit are available online from
Squadron.com
The long wait is over. After two months of postings concerning the
construction of the Hasegawa Tomcat kits, here is one of the
finished products. The two other Tomcats I have been working on are
still under construction with both being completed up to the point of
getting camouflage paint applied. After a brief break to regain my
composure, I will tackle these and bring them to completion, too. Until
then, enjoy the one that is completed.
Hasegawa's 1/48 Scale F-14A
Tomcat
|
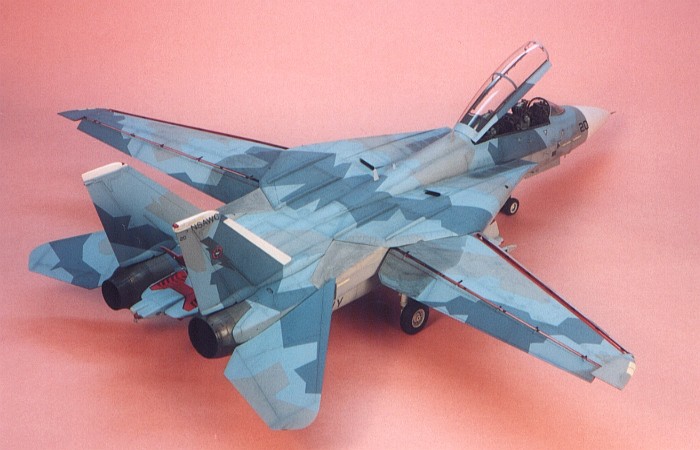
This is Hasegawa's 1/48 scale F-14A Tomcat. To read about the
building of the Hasegawa Tomcat kit, see my previous posting,
"Hasegawa Tomcat Kits".
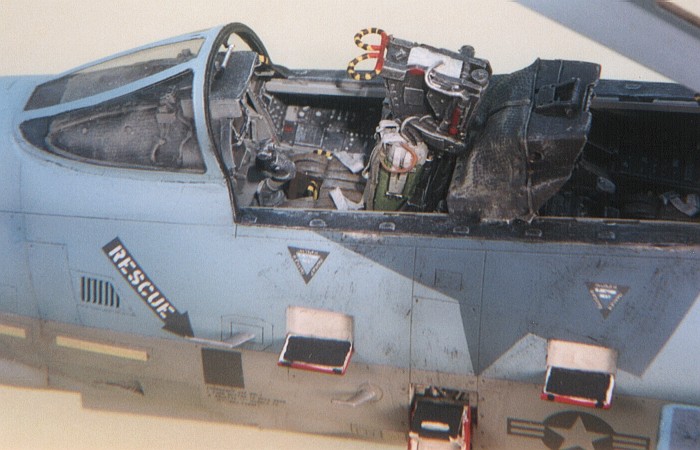
Into this model, I incorporated Black Box's resin cockpit set
and Eduard's photo etchings set. Additionally, I added a
Sidewinder missile and ACMI pod on the left wing glove pylon, taken from
the Hasegawa aircraft weapon sets. I had to scratch build the
second Sidewinder missile rail on the left glove pylon. The double
Sidewinder mount on the glove pylons is the only air-to-air missile
configuration not provided by Hasegawa in the kit.
With so many options available in the Hasegawa kit for
modeling so many Tomcat versions, it was not an easy task to single out
exactly one aircraft and set of markings to build. I was choosing
between a few different aircraft that I wanted to build. Then, a friend
I met through HyperScale, living in Utah, sent me an option I could not
resist. He visits NAS Fallon regularly and sent me some pictures of this
Tomcat followed by "official" NSAWC camouflage diagrams for the
aircraft. Who was I to turn down an opportunity on such a unique paint
scheme?
The final "setting of the hook" to get me to build this specific
aircraft came when I met my friend from Utah at NAS Fallon (in Nevada).
We were escorted on a photo tour of the NSAWC and VFC-13 flight lines.
Seeing the real aircraft that I was modeling, in action, did wonders at
inspiring me to continue the project and stick to this set of markings.
It also answered several questions I had regarding the exact camouflage
and markings of the aircraft.
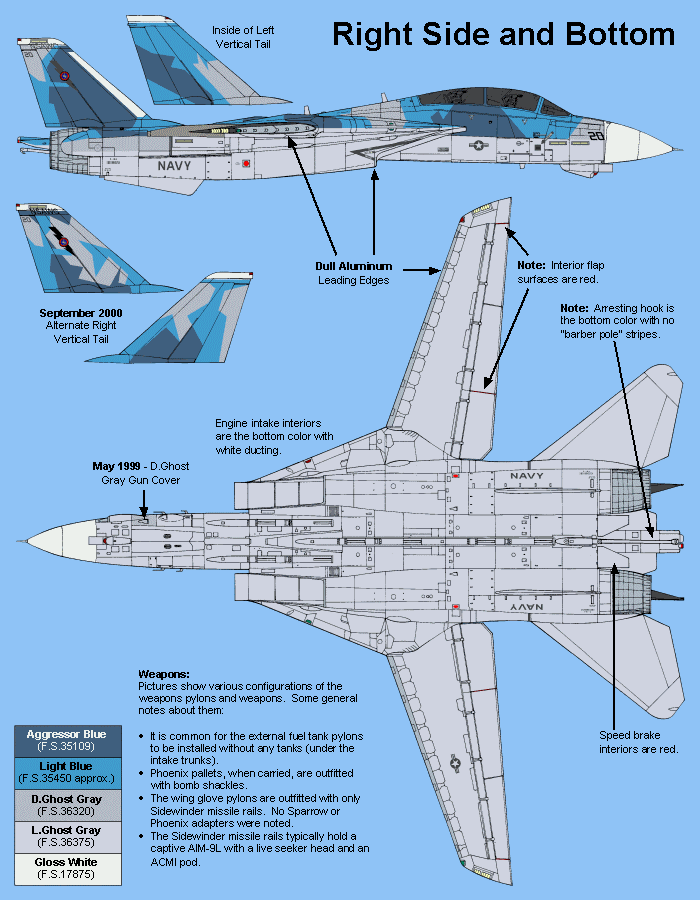
The "official" NSAWC camouflage diagrams of the aircraft provided me
the camouflage pattern and topside colors for this aircraft. Based on
what I saw of the aircraft on the flight line, the drawings were mostly
correct. The biggest variation in the camouflage is that there is a
definite lighter bottom color than the gray used on the topside
camouflage. The diagrams claim the bottom and topside grays are the
same. I ammended my interpretations of the camouflage diagrams
accordingly. The "official" diagrams also do not show the camouflage of
the inside tail surfaces. Seeing and photographing the aircraft in
person fixed this problem.
I "digitized" the NSAWC camouflage diagrams and corrected them to
match what I found in pictures and saw in person on the flight line.
Click the following links to see my camouflage and markings diagrams for
this aircraft. If you would like high-resolution hard-copy prints of
these diagrams, I am selling them for $5.00 (US) which includes postage.
Drop me an e-mail at
DWAungst@HotMail.com for more information.
| |
|
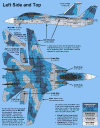
Left Side
and Top |
|
|
|
|
|
Right Side
and Bottom |
| |
For a full research posting on this aircraft, see my reference page
on the Aircraft
Resource Center in the Walk Arounds section of the site. The
reference page has over 50 pictures of the real aircraft taken by myself
and a few friends, spanning an eighteen month portion of the aircraft's
service with the NSAWC.
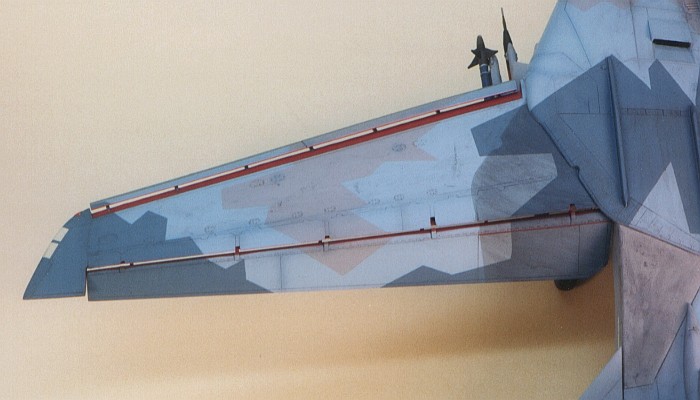
This camouflage is one of a couple non-standard schemes applied to
Tomcats at NSAWC. The top side is a three-color splinter camouflage of
two blues and a gray. The bottom is solid gray. The nose cone and tail
tips are gloss white. The scheme is intended to represent Su-27 Flankers
of Eastern Block air forces. The two blues are Aggressor Blue
(F.S.35109) and Air Superiority Blue (F.S.35450). The gray in the
topside splinter pattern is Dark Ghost Gray (F.S.36320). I determined
that the lower surface color is Light Ghost Gray (F.S.36375).
The "official" NSAWC camouflage diagrams actually name Light Blue
(F.S.35190) as the lighter blue color. After a long study of my pictures
(and some additional information from the Fallon paint shop), I decided
a closer match was Air Superiority Blue (F.S.35450). From the pictures I
took and others that I have seen from different sources, the lighter
blue on the aircraft is a little more rich and slightly greenish
compared to Air Superiority Blue. But, Air Superiority Blue is a much
closer match than Light Blue (F.S.35190).
I used all Testors Model Master enamel paints. All the colors,
except Air Superiority Blue, are bottled colors in the Model Master
line. As no manufacture seems to make Air Superiority Blue, I needed to
do some custom mixing to achieve this color. I found Flanker Medium Blue
in the Model Master line (stock#2131) was close, but it was a little too
light. I used it as the major color to mix the correct color. I used the
following ratio, 6:1. That is six parts Flanker Medium Blue with one
part Bright Blue (F.S.35183). This provides a color that is a dead-on
match with the color chip in my Federal Standard color fan.
Since the color in my pictures was slightly different from Air
Superiority Blue, I created another mix to actually paint the model. My
new mix was created in the following ratio, 5:2:1. That is five parts
Flanker Medium Blue with two parts Bright Blue (F.S.35183) and one part
Blue (F.S.35414). Decreasing the Flanker Blue (slightly) and increasing
the Bright Blue content made a slightly richer blue and adding the Blue
(F.S.35414) continued to make a richer blue while adding a slight
greenish tone to the color. With this mix, I was now happy that I had
gotten the color right.
Additionally, I scale effected the Aggressor Blue (F.S.35109) using a
5:1 ratio with Flat White.
I painted the camouflage using masks made from Scotch brand
Magic Transparent tape. I considered using Parafilm-M (my normal masking
medium), but thought better of it after considering some of the details
of the camouflage pattern. While fairly regular, the pattern does have
tight corners and straight edges that I had to take care to get right.
In my experience, Scotch tape works better at these sorts of
tasks.
At the time I started this model, no after-market company made decals
for this aircraft.
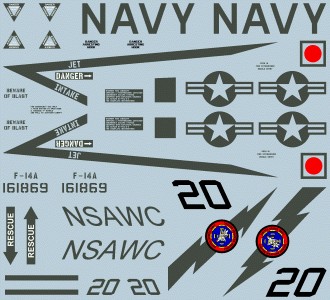 After
visiting NAS Fallon in person and creating my own decals for the model,
I found the notice on the TwoBobs
Decals web site stating that they were going to produce decals
for this exact aircraft. I got excited and sent TwoBobs an e-mail
asking if they would be interested in my research on the aircraft. They
were very interested. To make a long story short, this model is built
using the new TwoBobs decals which I received from them as
compensation for all my help on the decals.
After
visiting NAS Fallon in person and creating my own decals for the model,
I found the notice on the TwoBobs
Decals web site stating that they were going to produce decals
for this exact aircraft. I got excited and sent TwoBobs an e-mail
asking if they would be interested in my research on the aircraft. They
were very interested. To make a long story short, this model is built
using the new TwoBobs decals which I received from them as
compensation for all my help on the decals.
I do not want to sound like a TwoBobs commercial, here, but
the decal sheet is very complete. I made sure of that while I was
helping them. It provides markings for the aircraft as it was seen in
May of 1999. There were changes in the camouflage by April of 2000 and
still more by September of 2000 that interupted the original design of
the camouflage. I have noted the variations in my camouflage diagrams
above.
A few issues with the decals exist, but are not that noticable on the
completed model.
- The "NSAWC" and small "20" on the tails are in black. They should
be gray to match the lightning bolts. Likewise, the square and the
writing for the fire extinguisher entry on the engine nacelle side are
also black, but should be gray. After talking to TwoBobs, I
learned these were image glitches with the software they used to
create the decal images. These markings were gray in the original
images, but when they translated the images to send to them to the
printer, the software revised the colors of these images. Fortunately,
none of the rest of the markings on the sheet were effected.
- The small "20" on the tails should be at least 50% larger and
bolder.
- The "20" on the nose should be about 15% larger and bolder.
- The "Danger Arresting Hook" markings on the sides of the beaver
tail should be at least 100% to 150% larger. I actually printed
replacements for these markings to use on my model using clear decal
film and my ALPS printer.
- The fire extinguisher writing should be about 50% smaller.
- The lightning bolts are not sloped enough on the decal sheet. When
the decals are applied, following the natural slope of the tails, the
angle of the top of the lightning bolt is at the wrong slant. I fixed
this by trimming the top of the decals on the model before the decals
dried. Also, the Topgun badges end up not being oriented properly.
This is best seen when applying the yellow cross-hair decals. The
vertical orientation of the cross-hairs hits the MiG and surrounding
writing differently on the left side from the right side.
- All the provided slime lights are identical in size. While this is
true of the real lights on the real Tomcat, the Hasegawa scribing of
the tail top lights is different in size to the scribing on nose
sides. The decals are a bit taller and a lot smaller in width than the
scribing on the tail tops. The slime lights do match perfectly to the
scribed lights on the sides of the nose, though. I did some judicious
slicing to shorten the height of the lights for the tail tops. Then
added some extra width to the lights by using some of the extra slime
lights on the sheet.
- Lastly, the turbine warning stripe should be about 25% wider and
shortened in length by about a quarter of an inch. I applied a second
stripe along side of the first stripe to increase its width on the
model. Then, I trimmed the stripes to the correct length before the
decals dried.
I only noticed these things because I saw the aircraft in person and
did a lot of research to create my own decals for the model (prior to
learning that TwoBobs was doing it). On the completed model, none
of these issues is of any great consequence. I applied the decals using
Solv-a-set and had no troubles of any sort.
For weathering, I used my typical style of thinned down enamel paint
washes and air brush shading. I finished the weathering with some dry
brushing to pop out the surface details. For a more complete discussion
of what I do to weather my models, see my posting on
"Weathering Aircraft".
This Tomcat is one of three Tomcat models that I was building all at
the same time. The other two are F-14A+/B Tomcats. As I wrote at the
start of this posting, these other two Tomcats are not completed, yet.
After a bit of a break from them, I will return and finish both. It will
likely be next year before this happens, though.
Anyone that made it to the IPMS/USA National Convention in Chicago
this year has probably already seen this model in person. It was on
display on the TwoBobs vending table for Friday and Saturday of
the convention.
There are at least two other F-14s in similar blue camouflages from
NSAWC that I have seen in pictures. None of them have exactly the same
splinter camouflage pattern and each of them seems to use different
combinations of colors in the camouflage. Additionally, the other two
aircraft are marked in positive / negative markings rather than the all
dark gray markings on the aircraft I built here.
|
Additional
Images and Project Summary
|
Click the
thumbnails below to view images full-sized.
Click the "Back" arrow on your browser to return to this page.
|
[../photogallery/photo14469/real.htm]
|
|
Project
Statistics
|
|
Completion
Date:
|
10 August 2001 |
|
Total Building
Time:
|
125.1 |
|
Research:
|
5.9 |
|
Construction:
|
36.2 |
|
Painting:
|
54.8 |
|
Decals /
Markings:
|
4.8 |
|
Extra Detailing /
Conversion:
|
3.4 |
|
Go to Part One - Building the Black Box Cockpit
Go
to Part Two - Painting the Cockpit for Effect
Go to Part Three - Tomcat Construction
Model, Description and Images Copyright ©
2001 by David Aungst
Page Created 29 August, 2001 Home
| What's New |
Features |
Gallery |
Reviews |
Reference |
Forum |
Search
Home
| What's New |
Features |
Gallery |
Reviews |
Reference |
Forum |
Search